Now that we cleared that up, turn your long strip around (still right side facing up)to sew along the edge opposite the hem you just finished. Remember, DO NOT BACKSTITCH! Line up your presser foot with the edge of the fabric and sew straight down the line, when you get to the end DO NOT BACKSTITCH! But pull out the thread nice and long before you cut it free. Don't panic if your fabric bunches or "ruffles" just a bit as you sew, that is what we are going for! But also, don't panic if it doesn't ruffle, we are just warming up for the real ruffles!
After you have sewn the length of the strip, carefully separate the top thread from the bobbin thread and take hold of the top thread. If you sewed your fabric strip with the right side facing up, then your top thread is coming up out of the right side of the fabric. To make your ruffles, you are going to gently tug on the top thread in one hand, while pushing the fabric down the thread with the other hand. Be careful not to pull too hard and break the thread, or to tug on the bobbin thread, which will tighten it up and make it hard to pull the fabric down. You can work from both sides of the strip, pushing your fabric ruffles towards the middle. Try to make them evenly spaced.
When your strip is totally ruffled, you will want it to be the same length as the fabric that will make up the main part of the skirt (mine is the floral fabric). Here, pins are essential. Pin the ruffled strip right along the edge of the main skirt fabric, right sides together. Make sure your ruffled strip goes right from end to end of the main skirt and that your ruffles are pretty evenly spaced.
Before moving on, you'll need to change back the settings of your sewing machine to a normal stitch length and a normal thread tension. Now, with the ruffled fabric facing up, you are going to sew these two pieces together, right over the top of the bunched up ruffled fabric. Now it is appropriate to use a backstitch again, this seam is a keeper. Be sure to go slowly, keeping a nice straight line along the edge of the fabric with your presser foot and checking that your presser foot is going OVER the top of the ruffles rather than trying to flatten them out as it glides along. After you sew a straight stitch, go back and trim any stray strings, then zig zag along the seam to finish the edge.
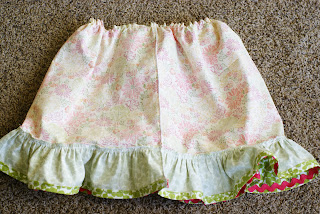
Unpin, lay it flat and check out your super cute little ruffle! Press the back so that it hangs down flat.
Next, fold the skirt in half aligning the raw edges, right sides together. You are basically sewing a straight piece of fabric into a circle (or a skirt!). If your fabric does not line up just right, keep in mind that is more important to line up the bottom of the dress because you still have time to fix the top part before attaching it to the bodice. Make sure to zig zag stitch this seam too.
Almost done! Just in case you were wanting or needing more
practice, we are going to do a repeat of the gathering stitch to ruffle the
skirt a bit too. If you want to go back and read the details again, go for it,
I am just going to do a quick refresher. Change the settings on your sewing
machine: longest stitch, highest number thread tension. Sew along the top,
unfinished edge, of your skirt starting as close to the seam you just finished.
Follow all along the circle until you get back to the seam again. Remember, DO
NOT backstitch! Also, don't let your ending stitches cross over your beginning
stitches; you will want both ends loose to tug your ruffles. For this step, I
kept the wrong side of the fabric face up, so my top thread was actually coming
up from the wrong side this time. Gather up your ruffles and space them evenly
along your skirt.
Grab your bodice that has been waiting in the wings. This part can be a little tricky, just take your time and you'll be fine. Keeping your skirt inside out, push your bodice down into the skirt part, neck and shoulders facing the bottom of the dress so that the right sides are together. That is just about as clear as mud, I know, so try and figure it out from the picture. Align the seam on the skirt with the center of the back of the bodice and pin along the raw edges where they meet. Then, use the top threads from your gathering stitches to tighten or loosen the skirt ruffles enough to fit the bodice and pin all around into place.
Switch your sewing machine back to it's normal settings, then sew the skirt and bodice together, over the face-up ruffles, beginning and ending at the seam on the skirt. Just before you make a full circle back to the seam, you can tighten or loosen your ruffles again to ensure a perfect fit to the bodice. Make sure the whole thing gets sewn on without any gaps or holes. Go back and finish this seam with a zig zag stitch.
Lastly, fold down the ruffled skirt and press the seam to keep it from flying up, and you are done! Go grab that little one and let her twirl around in her new ruffled dress, hand made with love, just for her.


No comments:
Post a Comment